Start Gardening: Part 5

Start Gardening: Part 5

I was thrilled as I approached my garden and saw such large leaves and tall plants, thinking about how much it has grown. And then upon getting closer I jumped with joy at the site of produce ripe and ready to be picked…There it all sat ready for me…zucchinis, kale, tomatoes, cabbage, green beans, and cucumbers!

I think this is the most fun time of year to have a garden because its beginning to be harvest time! This year we’ve put quite a bit of work into our garden, so its really nice to be reaping the fruits of our labors.

We left our garden with bags of produce; plenty to eat and some to share. I think our most exciting harvest were the zucchinis. As I approached them, all I could think, “is that this was not what I thought I planted.”

I thought I had planted the regular small, dark green zucchinis that you see in the grocery store. When in fact what I had planted are quite large and have white stripes on them. Sure enough after some research Matt and I discovered that what we had were Cousa Squash. These are middle eastern summer squash that is larger and thicker than regular zucchinis with whitish, green striping. They have a bit of a nuttier flavor than regular zucchinis as well.

We wondered what to do with these squash? I’ve never even heard of them. How do I prepare them?

I’m very excited to say, I’ve found quite a few ways to prepare them and can’t wait to share with you. So, look forward to my upcoming posts on various ways to use your zucchinis or cousa squash.

Closer Look: Apricots

Closer Look: Apricots

One thing I love about summer is the vast amount of fresh, ripe fruit. This time of year I get excited to go to the supermarket or farmer’s market because I know that an array of tasty jewels awaits me. And today I’m taking a Closer Look at just one of these ripe beauties: Apricots.

I remember my first encounter with Apricots. I was about 4 years old and my family and I were visiting my grandparents in McAllen, Texas. They had an Apricot tree in their yard and my grandmother, Nanny, baked Apricot pies. I remember thinking, “these are kind of like peaches, but look and taste a little different.” That’s where my intrigue with this fruit started.

Then for years I never saw Apricots other than dried ones, which I really enjoy, but wondered where the fresh ones are? Then I found them…ahhhh…sitting there in the fruit market, tiny, gold Apricots. I bought them that day and have been in love with them ever since. So, here’s a Closer Look at Apricots and why you should eat more of them.

What are Apricots?
Related to peaches these golden little fruits are a bit smaller than peaches, but still have the fuzzy skin. They are in the stone fruit family along with peaches, plums, and nectarines because of the pit in the center of the fruit that is much like a stone. They’re not quite as juicy as peaches, but are still very sweet with a slight tartness. Apricots are in season until the Fall.

How to select the best Apricots?
These little guys should be free of bruises or mold spots. The color of the skin should be a bright golden color. The fruit should be firm, but you should be able to press into the skin a little.

What are the health benefits of Apricots?
In just one cup of Apricot halves you will get 60% of your daily amount of vitamin A, over 25% of your vitamin C, as well as vitamins K, E, and folate. These tiny golden fruits also offer calcium, iron, magnesium, and potassium. They will also help you to reach your daily amount of fiber.

How do you eat Apricots?
No need to even peal the skin off these little guys, since the fuzz is less than that of a peach. I recommend just biting into this tasty treat. A couple bites is all it will take. If you’re looking for a way to prepare these, you can use them in anything you’d use peaches in, like pies, cobblers, or on top of ice cream.

I hope this will encourage you to look for these sweet little golden guys the next time you’re at the fruit market. Eat up the tastes of summer while they last! Enjoy!

Resources:
http://nutritiondata.self.com/facts/fruits-and-fruit-juices/1827/2
http://www.whfoods.com/genpage.php?tname=foodspice&dbid=3
http://agsci.psu.edu/fphg/stone

Baked Pasta Marinara with Goat Cheese & Kale

Baked Pasta Marinara with Goat Cheese & Kale

I’ve been gathering large bunches of kale from our garden and trying to cook them up in a variety of ways, so look forward to some tasty kale recipes including this one.

I came home the other day craving something hearty and cheesy, yet knew I had all these fresh veggies I needed to cook up as well. This recipe for Baked Pasta Marinara with Goat Cheese & Kale is the result. Its an original recipe of mine and I’m happy to be sharing it with you.

Ingredients:
1/2 cup crumbled goat cheese
1 1/2 cups grated cheese or cheese substitute (I used Daiya brand from Whole Foods)
1/2 pound ground beef
1 jar (26 oz.) pasta sauce
2 tablespoons olive oil
1 small onion, diced
2 cups sliced button mushrooms
1 1/2 teaspoons minced garlic
2 teaspoons Italian seasoning
16 oz. gluten free brown rice pasta (fusilli style)
1/4 cup water
Salt and pepper to taste

Directions:
1. Preheat oven to 375 degrees. Cook pasta slightly aldente, in salted water, according to package directions. Set aside.
2. While pasta is cooking, brown beef in large sauce pan. Add salt and pepper to taste and the Italian seasoning and 1/2 teaspoon minced garlic.
3. Drain meat. Add jar of sauce and goat cheese to the saucepan. Set aside.
4. Saute kale in 1 tablespoon olive oil (adding more if needed) with 1 teaspoon minced garlic, salt and pepper to taste. Once kale is wilted and begins to get dry add 1/4 cup water and continue cooking until kale is soft and water is absorbed.

5. Grease a 9 X 13 baking dish with remaining olive oil. Layer pasta, then sauce mixture, then mushrooms, then kale mixture. Pasta again, then sauce mixture, then mushrooms. And top it with grated cheese.


6. Bake at 375 degrees for 15 minutes, covering with foil if cheese browns. Serve and enjoy!

*Recipe Source: Madison Sommerfield
*Recipe Serves: 4 to 6 people

Skittles Birthday Cake

Skittles Birthday Cake

This month we celebrated Matt’s Birthday and every year I try to surprise him with some sort of creative gift or party. Since he is extremely supportive of my restricted diet and eats and cooks with me according to my diet even though he doesn’t have to, I decided to make him a “real” cake…no gluten free flours, egg replacers, or milk substitutes here…just a tried and true, every kid approved ‘funfetti’ cake with buttercream frosting.

You have to know that I generally get pretty cranky making food I can’t even lick the bowl while making, but for Matt’s birthday surprise I totally set that aside and nibbled my dark chocolate bar while making this treat for him.

That’s right, I don’t advocate heavily processed food filled with additives, preservatives, food colorings, and loads of sugar, but every supportive spouse, friend, or child of a person with food allergies totally deserves a birthday splurge.

I’m totally a chocolate girl all the way. If its sweet and doesn’t have chocolate what’s the point? But, Matt is totally a Twizzler, Starburst, Skittles kind of sweet tooth…sour, sweet and fruity flavors. So instead of decorating his birthday cake with sprinkles, to make this ‘funfetti’ cake extra special I decorated it with one of his favs…Skittles!

Not only did Matt love it, but so did the rest of his fam we celebrated with! The Skittles Birthday Cake was a huge success!

If you have a restricted diet and you have supportive loved ones don’t forget to show your appreciation for them by making a special treat for them every now and then. They’ll be so glad you did.

* FYI- I just found out Starbursts are gluten free. So, you restricted diet candy lovers rejoice!

Grilled Eggplant with Balsamic & Goat Cheese Goodness

Grilled Eggplant with Balsamic & Goat Cheese Goodness

Again last week I was checking out my local produce market and found Eggplant for sale for $0.59/ pound. “Wow huge deal,” I thought. But then I remembered, “I’ve never liked Eggplant anyway I’ve had it prepared. Its always been soggy and tasteless.” But, I’m like my mother in the way that I can hardly resist passing up a bargain, so the challenge was on!

My Challenge: To prepare eggplant in such a way that Matt and I would love it so much we’d just be waiting for it to go on sale again.

All I could think when I decided to purchase this cute little, purple squash-like veggie was that I’ve seen it in a variety of dishes people generally like, such as eggplant parmesan. There has to be a way to prepare it that enhances it’s natural God given goodness. I bought it with no idea how I was going to cook it, but picked up a few other veggies like cherry tomatoes, button mushrooms, and onions that were on sale as well…again, I’m a bargain shopper even when it comes to healthy food.

I pulled together a few ingredients and I’m happy to share that this Grilled Eggplant with Balsamic & Goat Cheese turned out so tasty! It’s my own recipe and I’m excited to share it with you. I hope this will encourage you to give Eggplant another try if you’ve never liked it in the past. And if you love it already, then here’s a new way to prepare it. Here’s to healthy cooking on a budget…Cheers!

*Goat Cheese is dairy, but many people such as myself that cannot tolerate dairy from a cow can tolerate a limited amount of dairy from goats or sheep. Its just a little different protein, possibly easier to digest. You should always check with your doctor if you have food allergies and are not sure about adding a new food into your diet.

Ingredients:
1 small eggplant, sliced lengthwise (about 1/4″ thick)
2 1/2 cups mushrooms, sliced
1 cup onion, diced
1 cup cherry tomatoes, sliced
1 teaspoon garlic, minced
1 tablespoon butter
4 tablespoons extra virgin olive oil
1 teaspoon fresh basil, chopped
1/2 cup sunflower seeds, unsalted
1/8 cup balsamic vinegar
1/4 cup to 1/2 cup crumbled goat cheese
salt and pepper to taste

Directions:
1. Saute sunflower seeds in a dry pan over low heat, stirring constantly, until slightly toasted. Set aside.

2. Preheat grill. Brush eggplant slices with olive oil on both sides, reserving 1 tablespoon. Cook eggplant on grill 2 to 4 minutes per side. Plate on serving platter.


3. In a fry pan heat 1 tablespoon olive oil on medium high heat. Saute mushrooms, onions, garlic and tomatoes until onions are translucent. Stir in butter and salt and pepper to taste.
4. Remove pan from heat and swirl in balsamic vinegar.
5. Pour veggie mixture over platted Eggplant. Crumble goat cheese, basil and sunflower seeds over top. Serve and enjoy!

*Why use sunflower seeds? I call them the poor woman’s pine nuts. Normally for a dish like this I’d use pine nuts toasted over top, but they are pretty pricey. I’ve found sunflower seeds add the same crunch and flavor for a whole lot less.

*Recipe Source: Madison Sommerfield
*Recipe Serves: 4 people

Nutritional Type: Eat Right for Your Body Type

Nutritional Type: Eat Right for Your Body Type

If you’re ready to shed a few extra pounds or just want to feel more energized you’ve got to check out Nutritional Typing. I’m really not a big believer in diets to solve weight issues. And if you struggle with lack of energy and fatigue coffee and energy drinks throughout your day are not the answer.

First things first…Why not diets for weight loss?
“Diets” (in the sense of a weight loss plan) tend to be generalized plans. These plans generally cut something out, like calories, fat, carbs, sugar, meat, grains, etc. From my personal experience, my own research, and stories from others I really believe that everyone does not benefit from the same dietary plan.

One person may lose 60 pounds on the ‘Atkins Diet‘ which cuts carbs but still allows higher fat foods, while another person may lose 60 pounds from a diet that is lower in fat but allows carbs. Reverse the 2 people’s dietary plans and they may lose no weight at all. If you happen to find the right diet for you, you may be able to shed the initial pounds you want to lose, but keeping off the pounds may be a huge challenge.

My solution: to the challenge of finding the right dietary plan and sticking to it is to find your Nutritional Type.
Nutritional Typing focuses on how your body reacts to the foods you eat. Some people may be very energized after eating a large plate of pasta, while another person may be ready for a nap after that same meal. Nutritional Typing can help match you up with the foods that will contribute to a healthy weight and the maximum energy for your body. Nutritional Typing is meant to be a way of eating. It doesn’t deprive you of any one food, but helps you to focus your eating on the foods that give you the most energy and help your metabolism kick in.

What about the Energy Issue?
Nutritional Typing can help you get the maximum amount of energy from your food. The general American diet is saturated with sugar, carbs, and sodium. And unfortunately for the majority of the population these don’t contribute to lasting energy.

How to find out your Nutritional Type
There are 2 sources that I think are pretty accurate Nutritional Typing tests:

Dr. Mercola’s Nuritional Typing Test is the first. This test is a series of questions you answer and as a result you are matched up with a Nutritional Type. There are 3 Nutritional Types that you could be according to this test: Carbohydrate Type, Protein Type, or Carb and Protein Combo Type. This test also hooks you up with meal plans to help you eat according to your type. Its a free test, you just create a log in. Check out this link: http://nutritionaltyping.mercola.com/login.aspx?ReturnUrl=%2fPreTestx.aspx

The other Nutritional Typing Test is a general informational video from The Today Show that has you look at where you gain weight and helps match you to the foods that will keep you lean and full of energy. Check out the video:

Grilled Portabella Mushrooms

Grilled Portabella Mushrooms

Third day without electricity and I’m ready for it to turn on anytime now. Over 800,000 people without power after the storm on Monday. Apparently there are only 150,000 people left without power today and I’m one of them. Oh well, can’t complain too much…life without electricity has been surprisingly peaceful. Needless to say, I’m seeking refuge again in the coffee shop.

Last week I was perusing through the supermarket and saw Portabella Mushrooms on a major sale. Admittedly, I have to say I’ve never tried them, but I’ve always heard good things from other people. So I decided to give them a shot and I really enjoyed them. Check out how I prepared them and enjoy them for yourself.

I suggest marinating Portabella Mushrooms, as they take on the flavor of whatever you cook them in. They make a really great vegetarian and vegan meal, so give them a try!

Ingredients:
4 medium sized portabella mushrooms
1/4 cup olive oil
4 tablespoons balsamic vinegar
4 cloves minced garlic
1 tablespoon dried basil
4 tablespoons onion, chopped

Directions:
1. Clean mushrooms by removing dirt from outer part of mushroom cap, breaking off the stems (reserve), and scrapping off the underside (black part) of the mushroom. Set aside.


2. With a whisk combine remaining ingredients in a medium sized mixing bowl.


3. Coat mushroom caps and stems in marinade and soak in marinade for up to 1 hour (not in refrigerator).


4. Heat grill to medium heat and grill mushrooms and stems over hot coals for 10 minutes. If using gas grill be careful not to burn.


5. Serve Portabella’s with remaining marinade poured over top. Serve the stems cut into small pieces in a tossed salad as they tend to be tougher. Enjoy!

*Recipe Serves: 2 people
*Recipe Source: Madison Sommerfield

Fresh Blooms: Bring ‘em Indoors

Fresh Blooms: Bring ‘em Indoors

Major power outage today in the Chicago’s Northwest suburbs, so I’m seeking refuge in a local coffee shop…never been so grateful for wi-fi, AC, a toilet I can flush and fresh water (we’re on a well, so no power means no flushing and no water as well), and fresh coffee (didn’t get it this morning before the power went out..and I’m no fun to be around if I don’t have coffee).

Apparently the power could be out for a few days, but I’m praying it’ll be back on much sooner. So, with the power out I thought it’d be a good day to show you how to bring the fresh beauty of the outdoors inside without much effort.

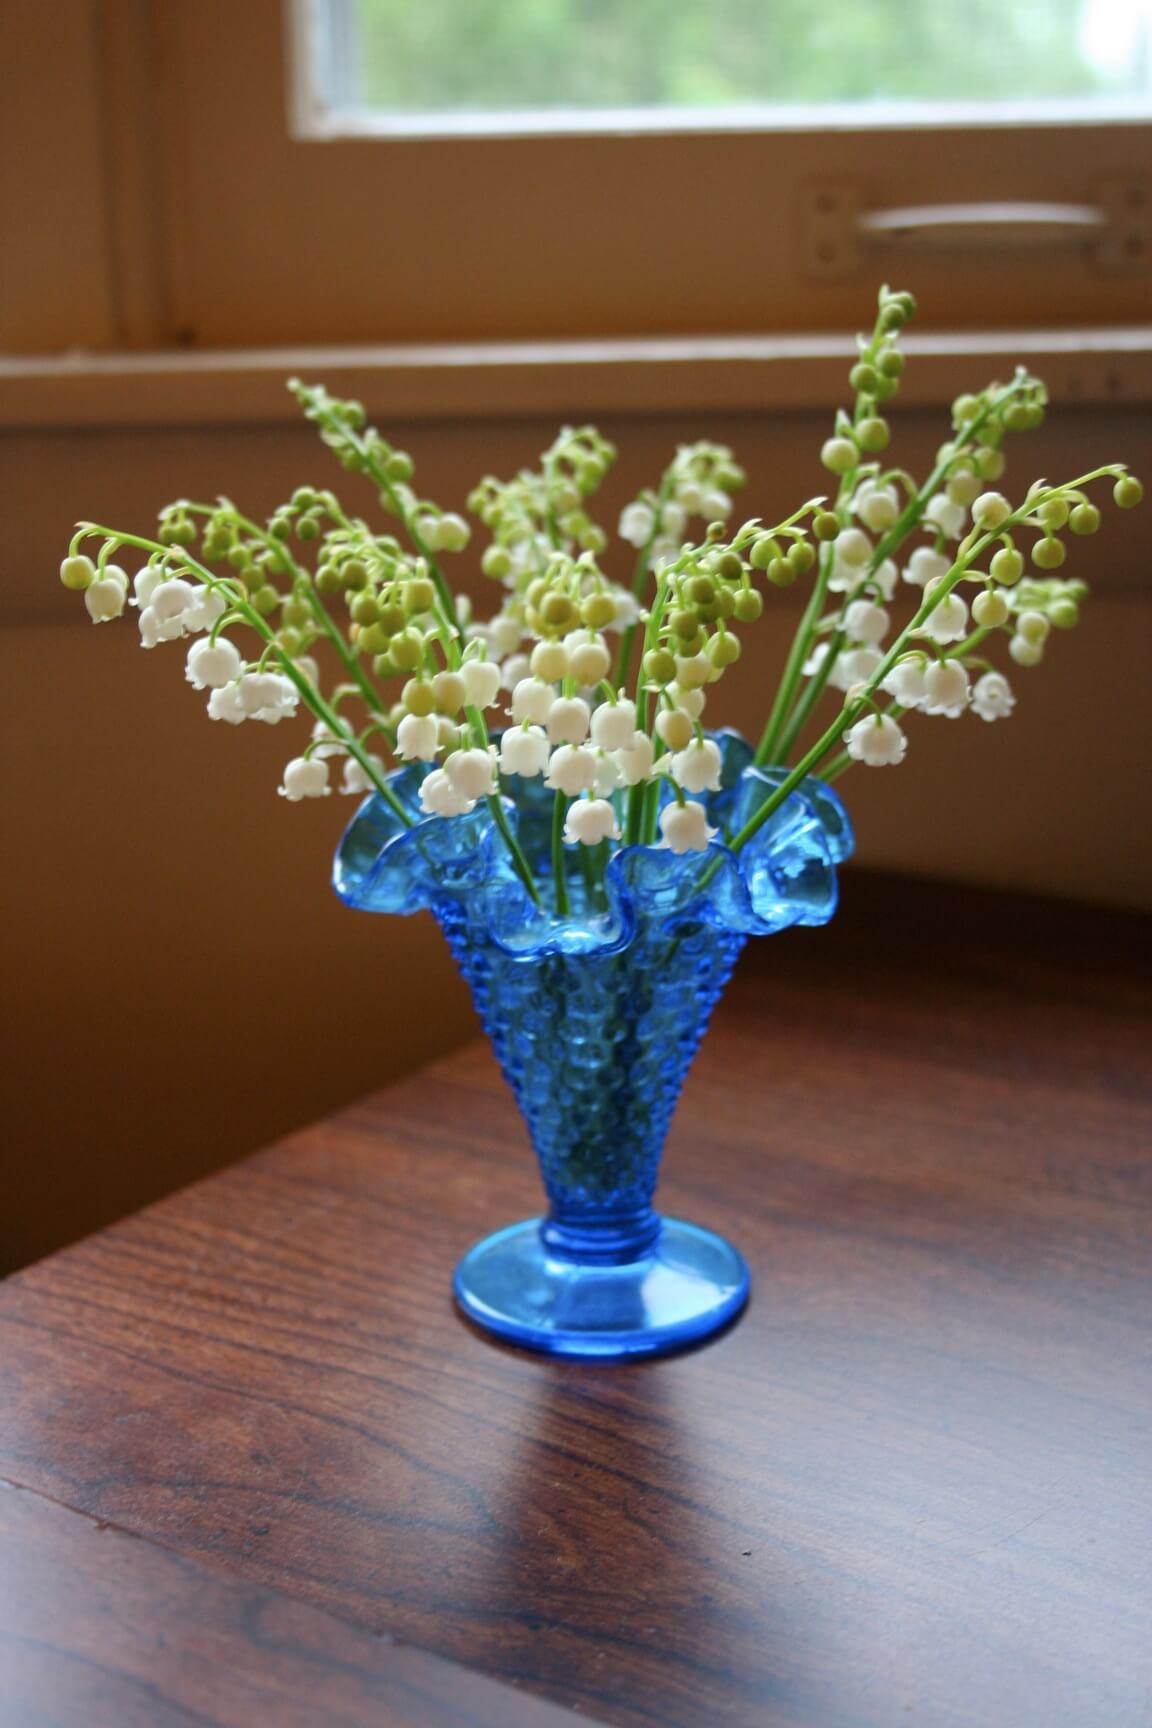
These are some Spring blossoms I brought indoors as they were blooming in my yard. First there was Lily of the Valley. These little bells of fragrance grow very low to the ground and often just look like ground cover growing around trees and in shaded flower beds. Often the leaves of this plant grow pretty thick and cover the blooms from sight, so clipping a few and bringing them indoors really displays their delicate beauty.

For Lily of the Valley I suggest placing a handful of blossoms in a colorful bud vase. Just this small cluster of blooms filled the whole living area of my home with a delightful fragrance…added bonuses of these buds! Keep their vase full of cold water and they’ll stay fresh for about a week.

Blooming next in my yard were the Lilacs. My whole neighborhood seemed to be filled with thick Lilac bushes this Spring. Lilacs grow in a variety of colors from purple to pink to white on rather large twiggy bushes. They are extremely fragrant, so a small cluster in a vase can really fill your home with a fresh scent. I’m not a fan of artificial lilac scents, but the real thing is delicious. Caution: some people are sensitive to their scent, but if you’re not, they’re perfect indoors. I suggest clipping a few twigs full of blossoms and placing them in a medium sized, clear vase. These cut flowers remained fresh in my home for about 4 to 5 days.

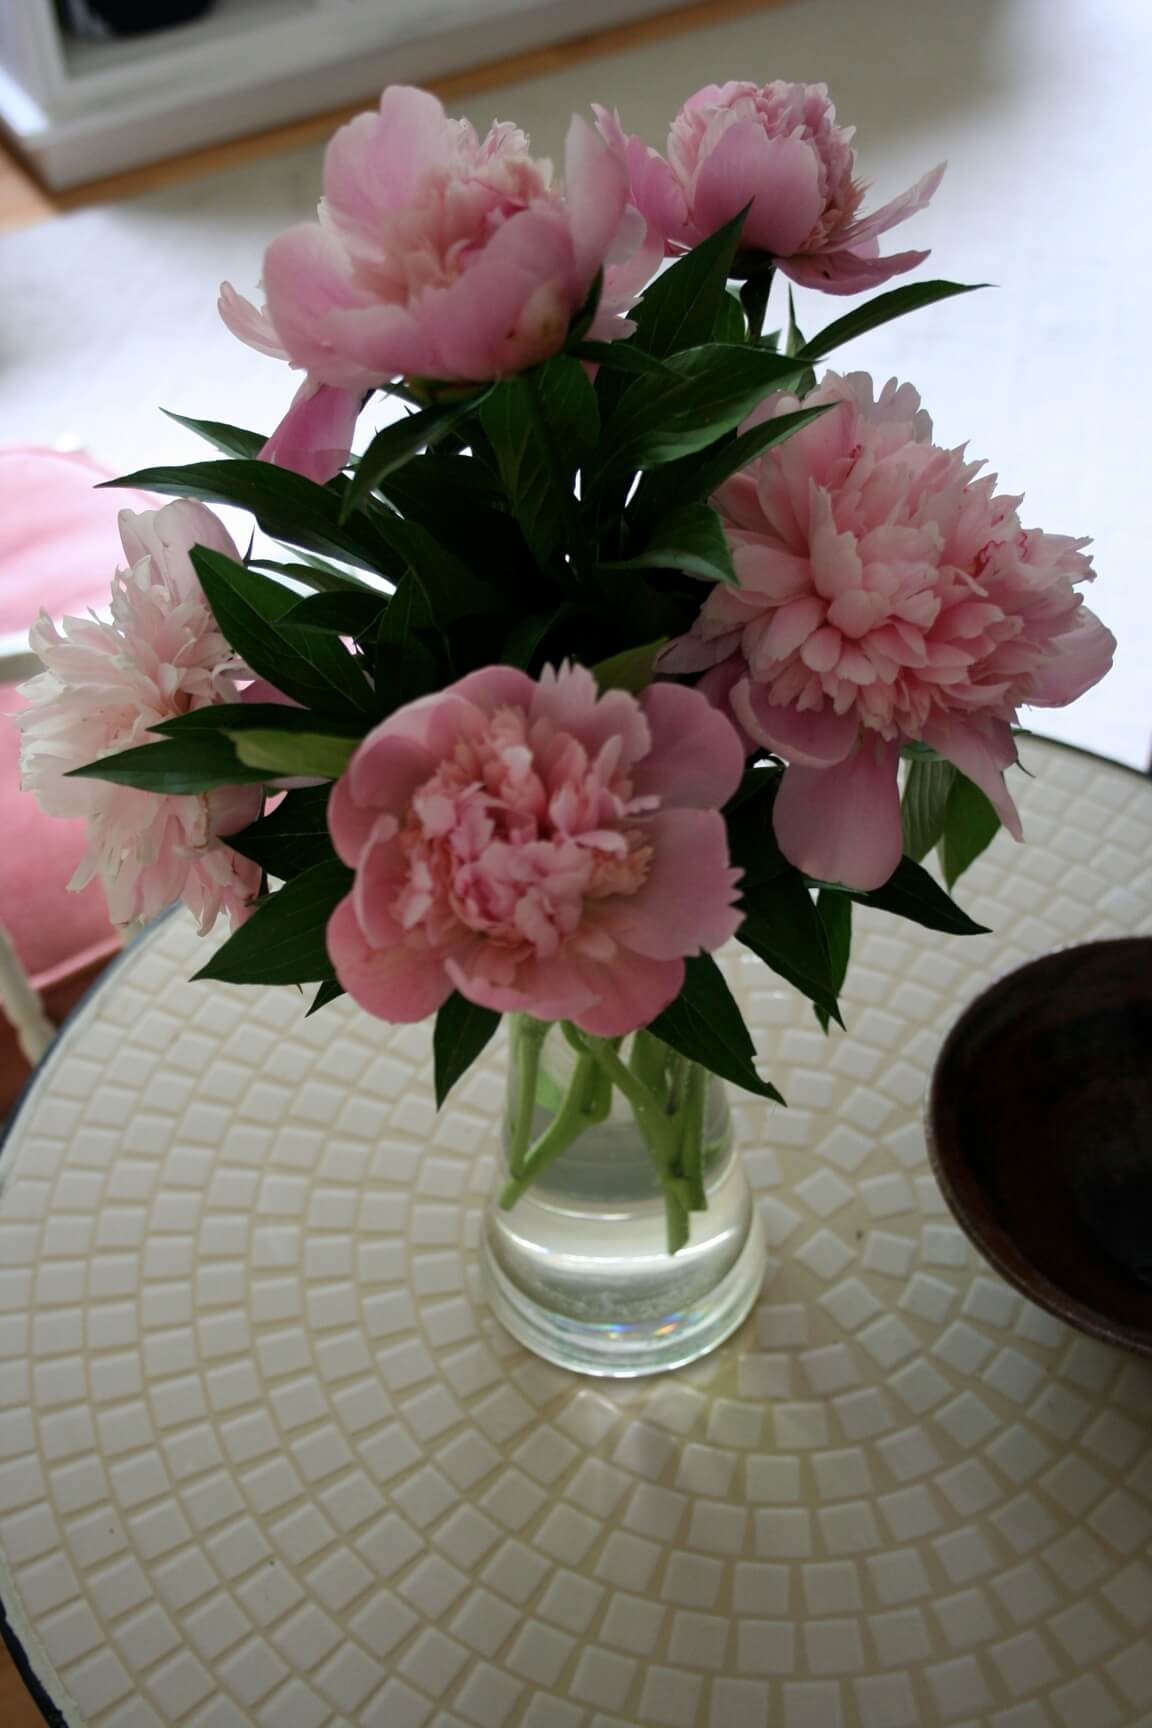
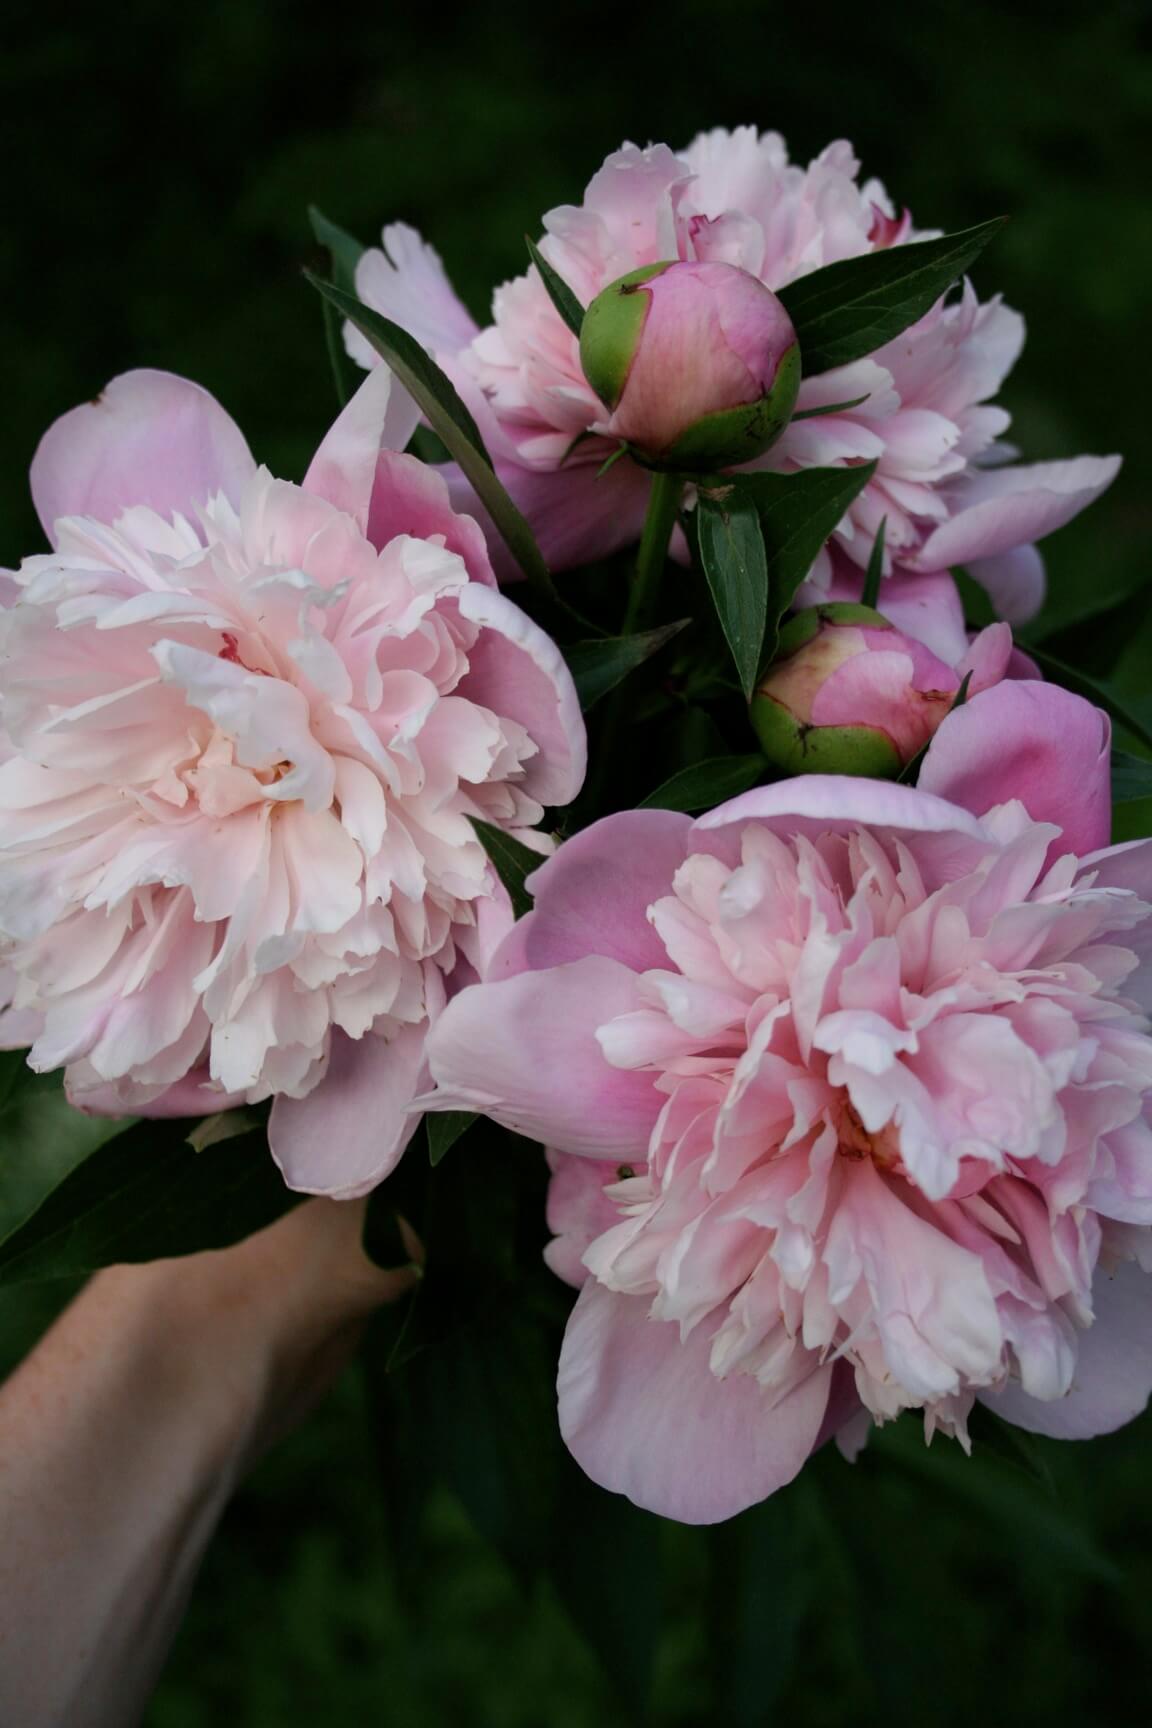
Popping up next in my yard were one of my favorites: Peonies. These delicate flowers grow in medium sized bush fulls in beds that receive partial sun partial shade. Peonies bring a truly romantic air to bouquets and vases everywhere from your home to a bridal bouquet…you can’t go wrong with these blooms, growing in varieties from dark pink to white.

I really think peonies are lovely in the natural bushes outdoors, but their beauty really seems to be displayed the best when they’re clipped and placed in a cluster in a medium to large sized clear vase in your home. They not only bring a fresh fragrance indoors, but add a touch of romance to your interior decor.

When you’re cutting a bunch of peonies, I suggest clipping half blossoms that are already mostly opened and half blooms that are in their bud form. This really seems to make your bouquet last the longest; mine lasted just over a week. Ok if you have peonies in your yard, I know exactly what you’re thinking…”They are always covered in ants outdoors. There’s no way I’m bringing them into my home.” Well, here’s your tip of the day…

Clip the bunch of peonies, tie some string around the bouquet and hang upside down for about an hour on your porch or deck. With gravity working to your advantage, the ants will work their way out of all the nooks and crannies of the flowers and you can bring your bouquet indoors bug free! Timing wise, clip the blooms before a heavy rain hits, as the rain destroys the blooms on their bushes.

General flower clipping tips to keep your flowers lasting their best the longest indoors:
-Use sharp shears to clip flower stems
-Clip stems at an angle
-Clip the stems a little longer than you want them to be in their vase
-Clip stems outdoors, bring flowers indoors, fill vase with cold water, clip stems again and immediately place in vase
-Keep water in vase free of flower petals and leaves
-Change water in your vase at least every other day
-If its cooler in your home, the clipped flowers will last longer
-Don’t place clipped flowers inside sunny windows
-Clip some flowers that have already bloomed and some just before they bloom to make the bouquets blooms last the longest
-Remove dead or wilted flowers from your vase ASAP

I hope you’ve enjoyed these tips to help freshen your home, bringing the outdoors in. If you live in the Midwest, here are some blooms to start looking for in your yard right now and in the months to come: zinnias, black eyed susans, daisies, cone flowers, hydrangeas, roses, and sunflowers to name a few. Enjoy the season both outdoors and inside your home!

Start Gardening: Part 4

Start Gardening: Part 4

Its been a while since you’ve seen my garden plot and wow has it grown! We’ve harvested tons of lettuce (loose leaf, bibb, and spinach) and have made tons of garden fresh salads.

The great part about lettuce is that it continues to produce more delicious leaves after you pick them. We haven’t replanted the lettuce at all and yet we’re still getting more and more! I have to admit that I’m not much of a salad girl, but when it comes to garden fresh, I love it. Check out these tasty salads.

I’ve also started to pick kale and cabbage leaves and chop them in with my other varieties of lettuce for my salads. They’re both kind of bitter, but mixed in with the other varieties they add a great melody of flavors and tons of extra vitamins and minerals.

To turn this garden salad into a heartier dinner salad I added black beans, sunflower seeds, and sliced yellow and red peppers. With a simple olive oil and balsamic vinegar dressing (1:1 ratio of each) it brings the flavors all together.

This is our second planting of radishes and they are a great addition to salads and a really spicy snack with hummus.

We’ve also recently harvested some small carrots. I must admit I was really a skeptic when it came to the carrots. I really didn’t think they would grow but much to my surprise, they proved me wrong.

My proud gardening hubby, very pleased with his harvest.

We’ve also picked a small bunch of really sweet peas and a few squash blossoms (post to come on how to eat these).

We haven’t really done anything special to get our garden growing along…just plenty of sunny days (provided by the Lord), water, and lots of love. Squash and tomatoes to come soon!

Grilled Peaches Dessert

Grilled Peaches Dessert

Many apologies to all my faithful readers for the lapse in posts, but sometimes life just gets a bit nutty. Its been a little while since my last post, but I’m back and starting off with a really tasty summer desert.

To me summer means hot, sunny days and an abundance of inexpensive fresh fruits and vegetables right at my fingertips. So, I say this time of year forgo frozen or canned produce in exchange for the fresh ripe cornucopia of options available. Right now the fruit that I’m loving here in the Midwest are peaches and blueberries. So, here’s a really simple way to pull them together into one really delicious dessert.

The base of this recipe is grilled peaches. That’s right…its fruit on the grill. Just trust me on this one and give it a shot. Heating the fruit pulls so much of the fruits’ natural sugars right to forefront of its taste, giving it an extra dose of sweetness. So here you go!

Ingredients:
4 peaches, cut in half and pit removed
Flavorless cooking oil (I used vegetable oil)
Blueberries
Your favorite flavor of sorbet (I used raspberry sorbet) (*Just FYI, sorbet does not contain dairy, but sherbet does)

Directions:

1. Preheat grill to a fairly low temperature.
2. In a large bowl toss peach halves with just enough cooking oil to lightly coat them.
3. Place peach halves face down on the grill, not directly over the flame. Grill them for just a couple minutes until the peaches have nice grill marks and are slightly cooked.
4. Serve grilled peach halves with a tiny scoop of sorbet in the center and blueberries scattered around the plate. Enjoy this refreshing taste of summer!

*Recipe Source: Madison Sommerfield
*Recipe Serves: 4 – 5 people