Category Archives: Healthy Living

Baked Spaghetti Squash Casserole

Baked Spaghetti Squash Casserole


Fall is really setting in and squash of all sorts are filling the produce isles of supermarkets everywhere. I always love to see the crazy varieties that abound, but often wonder how to prepare them. Maybe you’ve thought the same thing. That’s why, in addition to my typical cool weather recipes, I’m cooking with squash in a variety of ways throughout the season. Hope you’ll continue to tag along for the journey.

I’m starting out the squash adventure with Spaghetti Squash. When pulled apart with a fork the interior of this buttery beauty looks much like spaghetti noodles, hence the name. And the squash “noodles” can be used in place of regular spaghetti noodles in a variety of dishes. The benefits of using squash instead of pasta noodles include: lower in calories, gluten free, and the additional nutrients from the vegetable.

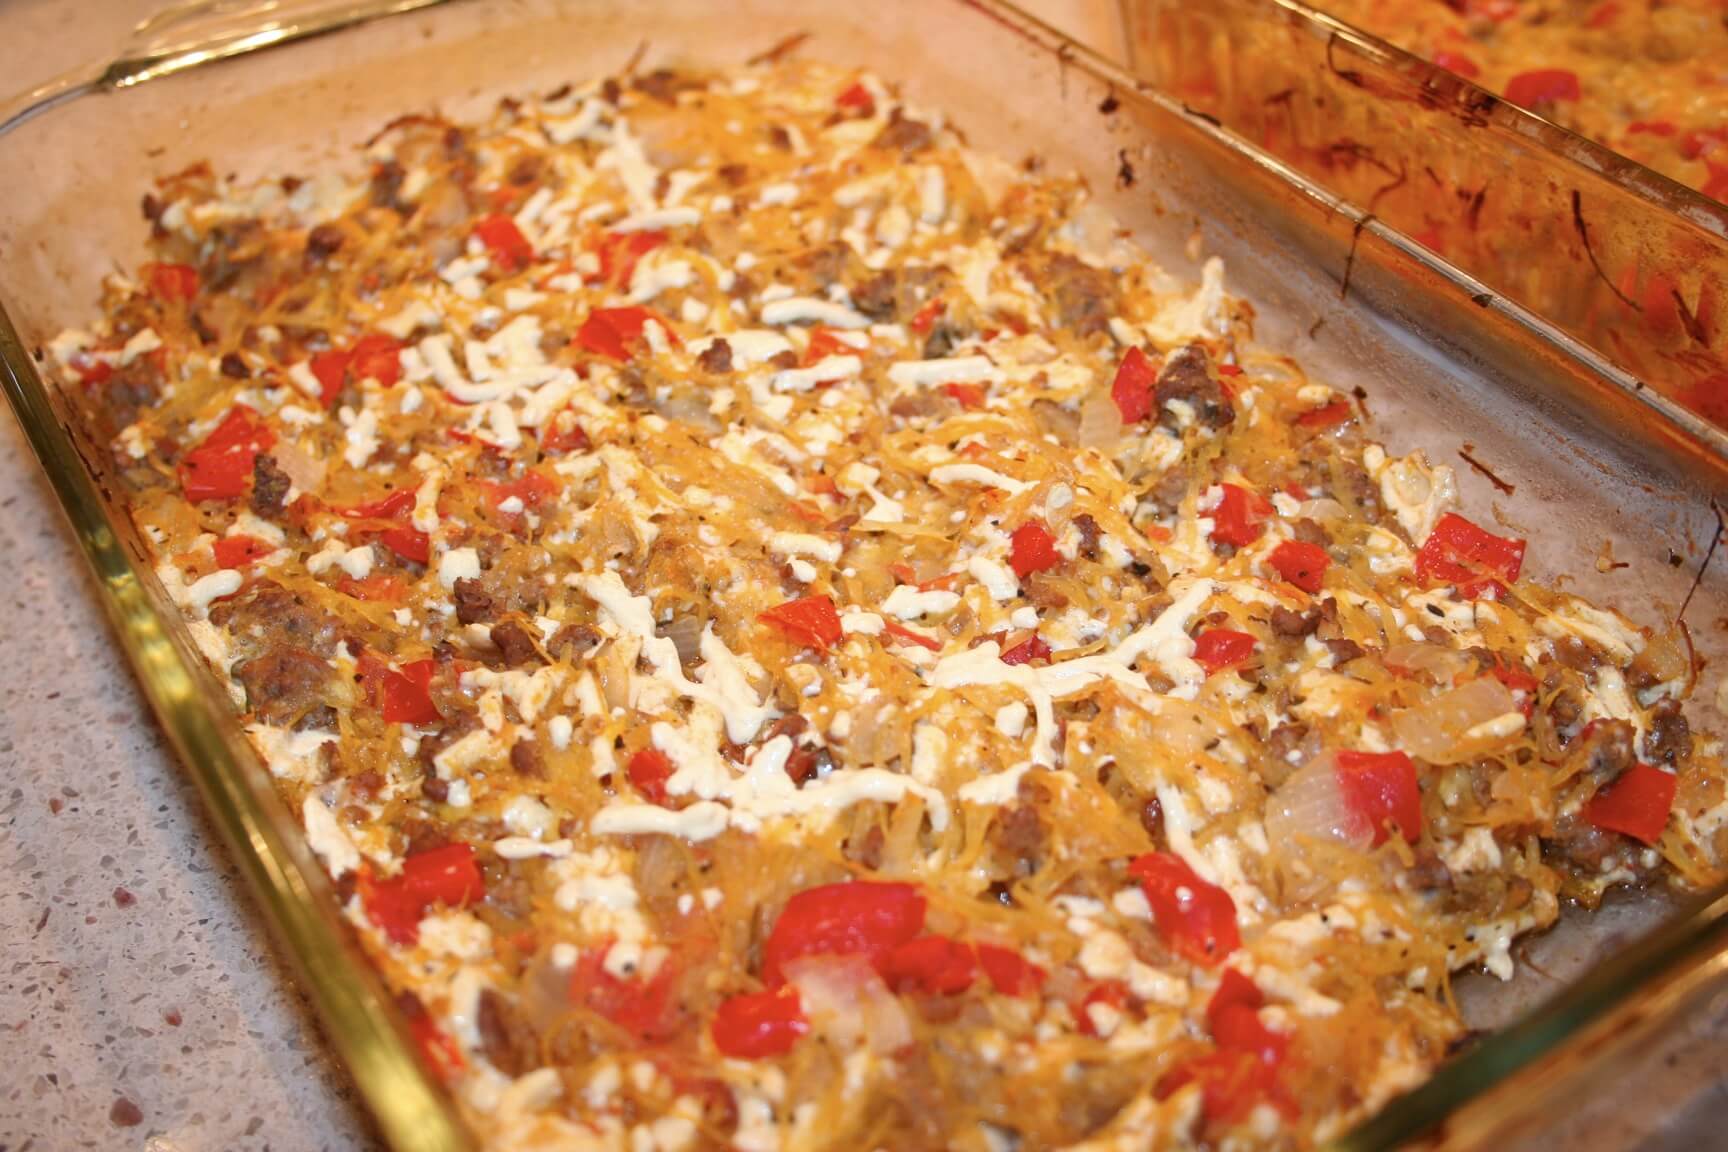
I’m starting out with Baked Spaghetti Squash Casserole with beef and vegetables. I was seriously impressed with this recipe. Its really tasty and even if you don’t like the taste of squash I think you’ll enjoy this one because it the dish really melds into its own flavor.

Ingredients:
1 spaghetti squash, cut in half and seeds removed
1 pound ground beef
1/2 cup red pepper, diced (I used 1 cup red pepper total and no green pepper)
1/2 cup green pepper, diced
1/4 cup onion, diced (I used more like 1/2 cup)
1 clove garlic, diced
1 (14.5 oz.) can Italian-style diced tomatoes
1/2 teaspoon dried oregano
1/2 teaspoon dried basil
1/4 teaspoon salt
1/4 teaspoon pepper
2 1/4 cup shredded cheese (I used Daiya Rice Cheese substitute)


Directions:
1. Preheat oven to 375 degrees.
2. Place squash on baking sheet and bake for 40 minutes or until tender. Then cool and pulp with a fork.

3. Reduce oven temperature to 350 degrees.
4. In pan over medium heat cook beef is browned. Then drain and mix in peppers, onion and garlic. Continue to cook and stir until vegetables are tender.


5. Mix the shredded squash and tomatoes into the skillet and season with salt, pepper, oregano, and basil. Cook and stir until heated through. Remove from the heat and mix in 2 cups cheese until melted. Pour mixture into prepared casserole dish.


6. Bake 25 minutes in preheated oven. Sprinkle with remaining cheese and continue to bake until cheese is melted. Serve and enjoy!


* This recipe serves 2 to 4 people.
* Recipe Source: All Recipes http://allrecipes.com/recipe/baked-spaghetti-squash-with-beef-and-veggies/detail.aspx
* Additional Ideas: Add Italian Sausage instead of ground beef for even more flavor. Use whatever veggies you like to include, like leftover veggies in the fridge. (For instance try mushrooms and spinach).


Easy Freezing

Easy Freezing

Generally I just cook for two people, Matt and myself. So, I often end up with more meat than we need for one meal. And after our successful gardening season I’ve ended up with more cousa squash than I know what to do with. All this to say freezing has become essential.

I got really tired of how long it took to thaw big clumps of frozen meat and it always get so disorganized in the freezer. So, here is a little tip for Easy Freezing.

Start off by dividing the meat into portions that you’d make for one meal. If you cook for just yourself then divide out the meat into single portions. If you cook for four people then divide the meat out for four portions.

With a permanent marker write out what you’re storing and the date onto a freezer bag. Place the meat into the bag and flatten with the palm of your hand until the meat is as flat as you can get it. Seal the bag getting all the air out that you can.

Store the bags flat in the freezer.

Storing meat this way, not only keeps your freezer organized, but it also cuts down the amount of time it takes to thaw it. It also thaws much more evenly when stored this way. This method works best for ground turkey, ground beef, ground chicken or flattened steaks or chicken breasts.

This method works really well for shredded zucchini, left over chopped fruit or other veggies. It also works really well for leftover soups, stews, chili, and pasta. Freeze individual portions and thaw the day before for lunch.

I hope this helpful tip will help you not only stay organized, but also save you time and keep you from wasting leftovers.

Buttery Dill Salmon

Buttery Dill Salmon

Summer has come to a close, but that doesn’t mean you can’t still enjoy fresh food. I had some leftover fresh dill and thought I shouldn’t let it go to waste. It has such a fresh flavor and it compliments fish so well. So, I found this recipe for Buttery Dill Salmon. Its very easy to make and tastes delicious. I hope you’ll enjoy it as much as I did.

Ingredients:
2 salmon steaks
1/4 teaspoon salt
1/2 teaspoon black pepper
1 teaspoon onion powder
2 tablespoons Fresh dill (you could also use 1 tablespoon dried dill instead)
2 tablespoons butter
1 tablespoon olive oil

Directions:
1. Preheat oven to 400 degrees. Combine spices in a bowl.
2. Dry Salmon fillets with paper towel.
3. Drizzle olive oil in the bottom of a square baking dish. Lay fish fillets in dish.
4. Sprinkle spice mixture over fish. Place 1 pat of butter on top of each fillet.
5. Bake for 20 to 25 minutes. Fish is finished cooking when flaky. Serve and enjoy!

* Serve the salmon with a baked sweet potato and freshly cooked green beans.
* Recipe serves 2 people
* Recipe Source: Based on http://allrecipes.com/recipe/salmon-with-dill/detail.aspx

Simple Greek Salad

Simple Greek Salad


The cooler weather blowing in over the last has been a reminder that summer is soon coming to an end. So, I say to soak it up while you can. I’m savoring the flavors of summer from the garden with this recipe. I hope you’ll make it for yourself and enjoy it!

This Greek Salad makes a great salad to go with any meal or is a great mini lunch on its own. I’ll give you general ratios on the quantities here, so make as much or little as you like and adjust the ingredients to taste.

Ingredients:
1 part chopped fresh tomatoes
1 part chopped cucumbers
1/2 part sliced onions
Crumbled goat cheese or feta cheese to taste
Olive oil and vinegar salad dressing to taste (Make your own by mixing half olive oil and half red wine vinegar or use Newman’s Olive Oil and Vinegar Dressing)
Salt and Pepper to taste

*Extra Taste: Add sliced kalamata olives for an extra punch of flavor

Directions:
1) Combine tomatoes, cucumbers, and onions in a bowl.
2) Pour dressing over the top and combine. Season with salt and pepper to taste.
3) Top with the crumbled cheese and stir to combine. Serve and enjoy!

*Recipe Source: Madison Sommerfield

One Dish Fridge Roundup

One Dish Fridge Roundup

There is such a huge variety of vegetables that are abundant this time of year in gardens, farmer’s markets, and supermarkets. And if you’re like me, maybe you get a little excited and buy more vegetables than you can use for your meal. I recently ended up with more squash, asparagus, and green and red peppers than I needed for my meal. With these leftovers I wondered what I could make.

Growing up, Thursdays were always left-overs-for-dinner days at my house, which mostly meant find anything in the fridge to eat for dinner so nothing goes to waste. Well, here’s a new version of left overs that’s more appropriate for summer. This one uses all your left over vegetable odds and ends. So here’s how I came up with this dish:

1) My first requirement when creating a meal out of these left over veggies was that I wanted the dish to display the great taste of summer that is all these fresh veggies, but I wanted them to blend to create a new unified flavor all their own.

2) My second requirement was to keep the amount of dishes I used to a minimum (no more time doing the dishes than absolutely necessary.)

3) The third requirement for this dish was that it had to fit my restricted diet (gluten free, egg free, dairy free.)

That’s why this One Dish Fridge Roundup is the perfect summer dish. Hope you enjoy the fresh tastes of summer in one dish! I’m going to show you how I made mine but the whole point is to use what you have. So, if you have green beans rather than peppers use those and if you have salmon rather than chicken use that. Enjoy!

Ingredients:
1 potato (cooked just about 2 minutes in the microwave then cubed)
1/2 an onion, sliced
1/2 cup zucchini, chopped
1/2 cup peppers, roughly chopped
1/2 cup asparagus, chopped
1 cup tomatoes, chopped
1 chicken breast, pounded thin and cubed
1 teaspoon garlic, minced
Olive oil
Aunt Cora’s Seasoning or season salt to taste
Lemon pepper to taste

Directions:
1. Saute onion and potato in about 1 tablespoon olive oil in a large fry pan until onion is transparent and potato begins to soften, adding more oil if needed. Season to taste.


2. Add asparagus and peppers and stir adding just a little water to deglaze the pan. Cook for 1 to 2 minutes. Add garlic and season.

4. Add chicken and season. Cover and cook until chicken is cooked through, stirring occasionally. Serve and enjoy!

*Recipe serves: 4 people
*Recipe source: Madison Sommerfield

Zucchini Bread

Zucchini Bread

We’ve been harvesting lots more zucchinis from our garden, so I’ve been experimenting with more ways to use this lovely squash that’s in such abundance right now.

These are actually cousa squash that we’re harvesting and cooking. They’re a type of middle eastern zucchini that are nuttier in flavor, which adds a really nice flavorful kick to this delicious Zucchini Bread recipe. It makes a really tasty breakfast, snack, or dessert so I hope you enjoy this one!

Ingredients:
2 cups shredded zucchini or cousa squash (leaving the skin on leaves lots of nutrients in your bread)
1/2 cup water
3 eggs worth of gluten free egg replacer
2 cups sugar
1 cup oil
3 cups all purpose gluten free flour blend
1/2 tablespoon baking powder
1 teaspoon salt
1 teaspoon baking soda
3 teaspoons cinnamon
3 teaspoons vanilla
2 1/4 teaspoon xanthum gum

Directions:
1. Preheat oven to 350 degrees. In a blender combine shredded zucchini and water until pureed into a fine pulp.

2. In a separate container combine egg replacer (as prepared on package instructions), sugar, and oil.

3. Pour mixture into mixing bowl and gradually blend in flour, baking powder, salt, baking soda, cinnamon, vanilla, and xanthum gum. Blend with mixer until combined.
4. Add zucchini mixture into the bowl and blend to combine.

5. Grease 2 loaf size baking pans with cooking spray and pour mixture equally divided into pans. Make sure the pans are not filled more than 3/4 of the way full.
*If you have remaining batter you can pour it into pre-prepared muffin pans, but you’ll have to cook them in much less time than the bread.

6. Bake bread for 1 hour. Remove and allow them to cool before cutting. Refrigerate once bread has cooled. Enjoy!

*You can also chop the zucchini rather than shredding, but just make sure it comes out to 2 cups total. I’ve found with this gluten free and egg free bread, blending the zucchini into a puree helps it hold together better.

*The addition of the xanthum gum to the recipe helps the bread to hold together as well too.

*Recipe Source: Tammy Peterkort

Stuffed Cousa Squash

Stuffed Cousa Squash

Been a crazy week…took a little impromtu road trip to St. Louis, spent time with college friends, and had a lot of fun! I just love summer and what’s summer without random road trips here and there?

Anyway, as promised last week here’s your first way to use zucchinis and in particularly here Cousa Squash. Just in case you forgot, Cousa Squash are middle eastern zucchinis that are a little larger and taste a little nuttier than your regular zucchinis. In this stuffed squash recipe I used Cousa Squash, but you could easily replace it with large regular zucchinis.

This recipe really incorporates middle eastern flavors into a full meal within these squash. Its saucy, hearty, and yet uses great fresh summer ingredients. I hope you enjoy this one!

Ingredients:
1 large Zucchini (I used Cousa Squash)
1 small onion, chopped
1 roma tomato, chopped
1 tablespoon minced garlic
1/4 pound ground beef, or lamb, or turkey (I used ground beef)
4 tablespoons tomato paste
32 oz. vegetable broth
1/3 cup brown rice, precooked
3/4 teaspoon cinnamon
3/4 teaspoon tumeric
1 tablespoon olive oil
salt and pepper to taste

Directions:
1. Preheat oven to 375 degrees. First cut the squash in half lengthwise.


2. Then with a spoon, scoop out to pulp and seeds. Separate the seeds from the pulp. Reserve the pulp.


3. In a large frying pan heat the olive oil and saute the ground beef, onion, and garlic until the meat is cooked through. Drain the fat from the meat. Add the squash pulp and saute until soft, breaking up large pieces as you cook.
4. Season the meat and squash mixture with salt and pepper to taste. Then add the tumeric and cinnamon.

5. Add rice and tomato to the rest of the dish and stir to combine.


6. Stuff each squash half with the rice/beef/vegetable mixture. Reserve the fry pan. Place the halves in a 9X13 (oven safe) casserole dish. Top each squash off with cinnamon sprinkled on top.


7. In the reserved fry pan add the broth and tomato paste over low heat and stir carefully to combine.


8. Carefully remove the soup mixture from the heat and pour into the squash dish.

9. Bake for 20 minutes. Then cover with foil and bake for another 10 minutes. If you like the squash to be a little softer bake for another 5 minutes. Serve the stuffed squash with the broth mixture drizzled over each half and the plenty more to surrounding each half. Enjoy!

*Recipe Serves: 2 hungry people
*Recipe Source: Madison Sommerfield
*Recipe Inspirations: http://cucinapanzano.blogspot.com/2009/07/summer-squashcousa.html
http://www.myfreshlevant.com/2009/06/quinoa-stuffed-cousa-squash.html

Start Gardening: Part 5

Start Gardening: Part 5

I was thrilled as I approached my garden and saw such large leaves and tall plants, thinking about how much it has grown. And then upon getting closer I jumped with joy at the site of produce ripe and ready to be picked…There it all sat ready for me…zucchinis, kale, tomatoes, cabbage, green beans, and cucumbers!

I think this is the most fun time of year to have a garden because its beginning to be harvest time! This year we’ve put quite a bit of work into our garden, so its really nice to be reaping the fruits of our labors.

We left our garden with bags of produce; plenty to eat and some to share. I think our most exciting harvest were the zucchinis. As I approached them, all I could think, “is that this was not what I thought I planted.”

I thought I had planted the regular small, dark green zucchinis that you see in the grocery store. When in fact what I had planted are quite large and have white stripes on them. Sure enough after some research Matt and I discovered that what we had were Cousa Squash. These are middle eastern summer squash that is larger and thicker than regular zucchinis with whitish, green striping. They have a bit of a nuttier flavor than regular zucchinis as well.

We wondered what to do with these squash? I’ve never even heard of them. How do I prepare them?

I’m very excited to say, I’ve found quite a few ways to prepare them and can’t wait to share with you. So, look forward to my upcoming posts on various ways to use your zucchinis or cousa squash.

Closer Look: Apricots

Closer Look: Apricots

One thing I love about summer is the vast amount of fresh, ripe fruit. This time of year I get excited to go to the supermarket or farmer’s market because I know that an array of tasty jewels awaits me. And today I’m taking a Closer Look at just one of these ripe beauties: Apricots.

I remember my first encounter with Apricots. I was about 4 years old and my family and I were visiting my grandparents in McAllen, Texas. They had an Apricot tree in their yard and my grandmother, Nanny, baked Apricot pies. I remember thinking, “these are kind of like peaches, but look and taste a little different.” That’s where my intrigue with this fruit started.

Then for years I never saw Apricots other than dried ones, which I really enjoy, but wondered where the fresh ones are? Then I found them…ahhhh…sitting there in the fruit market, tiny, gold Apricots. I bought them that day and have been in love with them ever since. So, here’s a Closer Look at Apricots and why you should eat more of them.

What are Apricots?
Related to peaches these golden little fruits are a bit smaller than peaches, but still have the fuzzy skin. They are in the stone fruit family along with peaches, plums, and nectarines because of the pit in the center of the fruit that is much like a stone. They’re not quite as juicy as peaches, but are still very sweet with a slight tartness. Apricots are in season until the Fall.

How to select the best Apricots?
These little guys should be free of bruises or mold spots. The color of the skin should be a bright golden color. The fruit should be firm, but you should be able to press into the skin a little.

What are the health benefits of Apricots?
In just one cup of Apricot halves you will get 60% of your daily amount of vitamin A, over 25% of your vitamin C, as well as vitamins K, E, and folate. These tiny golden fruits also offer calcium, iron, magnesium, and potassium. They will also help you to reach your daily amount of fiber.

How do you eat Apricots?
No need to even peal the skin off these little guys, since the fuzz is less than that of a peach. I recommend just biting into this tasty treat. A couple bites is all it will take. If you’re looking for a way to prepare these, you can use them in anything you’d use peaches in, like pies, cobblers, or on top of ice cream.

I hope this will encourage you to look for these sweet little golden guys the next time you’re at the fruit market. Eat up the tastes of summer while they last! Enjoy!

Resources:
http://nutritiondata.self.com/facts/fruits-and-fruit-juices/1827/2
http://www.whfoods.com/genpage.php?tname=foodspice&dbid=3
http://agsci.psu.edu/fphg/stone

Baked Pasta Marinara with Goat Cheese & Kale

Baked Pasta Marinara with Goat Cheese & Kale

I’ve been gathering large bunches of kale from our garden and trying to cook them up in a variety of ways, so look forward to some tasty kale recipes including this one.

I came home the other day craving something hearty and cheesy, yet knew I had all these fresh veggies I needed to cook up as well. This recipe for Baked Pasta Marinara with Goat Cheese & Kale is the result. Its an original recipe of mine and I’m happy to be sharing it with you.

Ingredients:
1/2 cup crumbled goat cheese
1 1/2 cups grated cheese or cheese substitute (I used Daiya brand from Whole Foods)
1/2 pound ground beef
1 jar (26 oz.) pasta sauce
2 tablespoons olive oil
1 small onion, diced
2 cups sliced button mushrooms
1 1/2 teaspoons minced garlic
2 teaspoons Italian seasoning
16 oz. gluten free brown rice pasta (fusilli style)
1/4 cup water
Salt and pepper to taste

Directions:
1. Preheat oven to 375 degrees. Cook pasta slightly aldente, in salted water, according to package directions. Set aside.
2. While pasta is cooking, brown beef in large sauce pan. Add salt and pepper to taste and the Italian seasoning and 1/2 teaspoon minced garlic.
3. Drain meat. Add jar of sauce and goat cheese to the saucepan. Set aside.
4. Saute kale in 1 tablespoon olive oil (adding more if needed) with 1 teaspoon minced garlic, salt and pepper to taste. Once kale is wilted and begins to get dry add 1/4 cup water and continue cooking until kale is soft and water is absorbed.

5. Grease a 9 X 13 baking dish with remaining olive oil. Layer pasta, then sauce mixture, then mushrooms, then kale mixture. Pasta again, then sauce mixture, then mushrooms. And top it with grated cheese.


6. Bake at 375 degrees for 15 minutes, covering with foil if cheese browns. Serve and enjoy!

*Recipe Source: Madison Sommerfield
*Recipe Serves: 4 to 6 people