Category Archives: Miscellaneous

Inhabit Photos

Inhabit Photos

As promised, here are some photos from, Inhabit, the plays I worked on doing set design. The scenes were set in an office building/warehouse, so my big challenge was to transform the spaces in just one night (I had lots of great help). Nothing was bought…everything was bought, borrowed, or temporarily stolen from cast or crew member’s homes.

I love before & after photos because they truly show transformation. So, here are the photos! There are a few scenes left out…taking photos during the craziness of the event was a challenge.

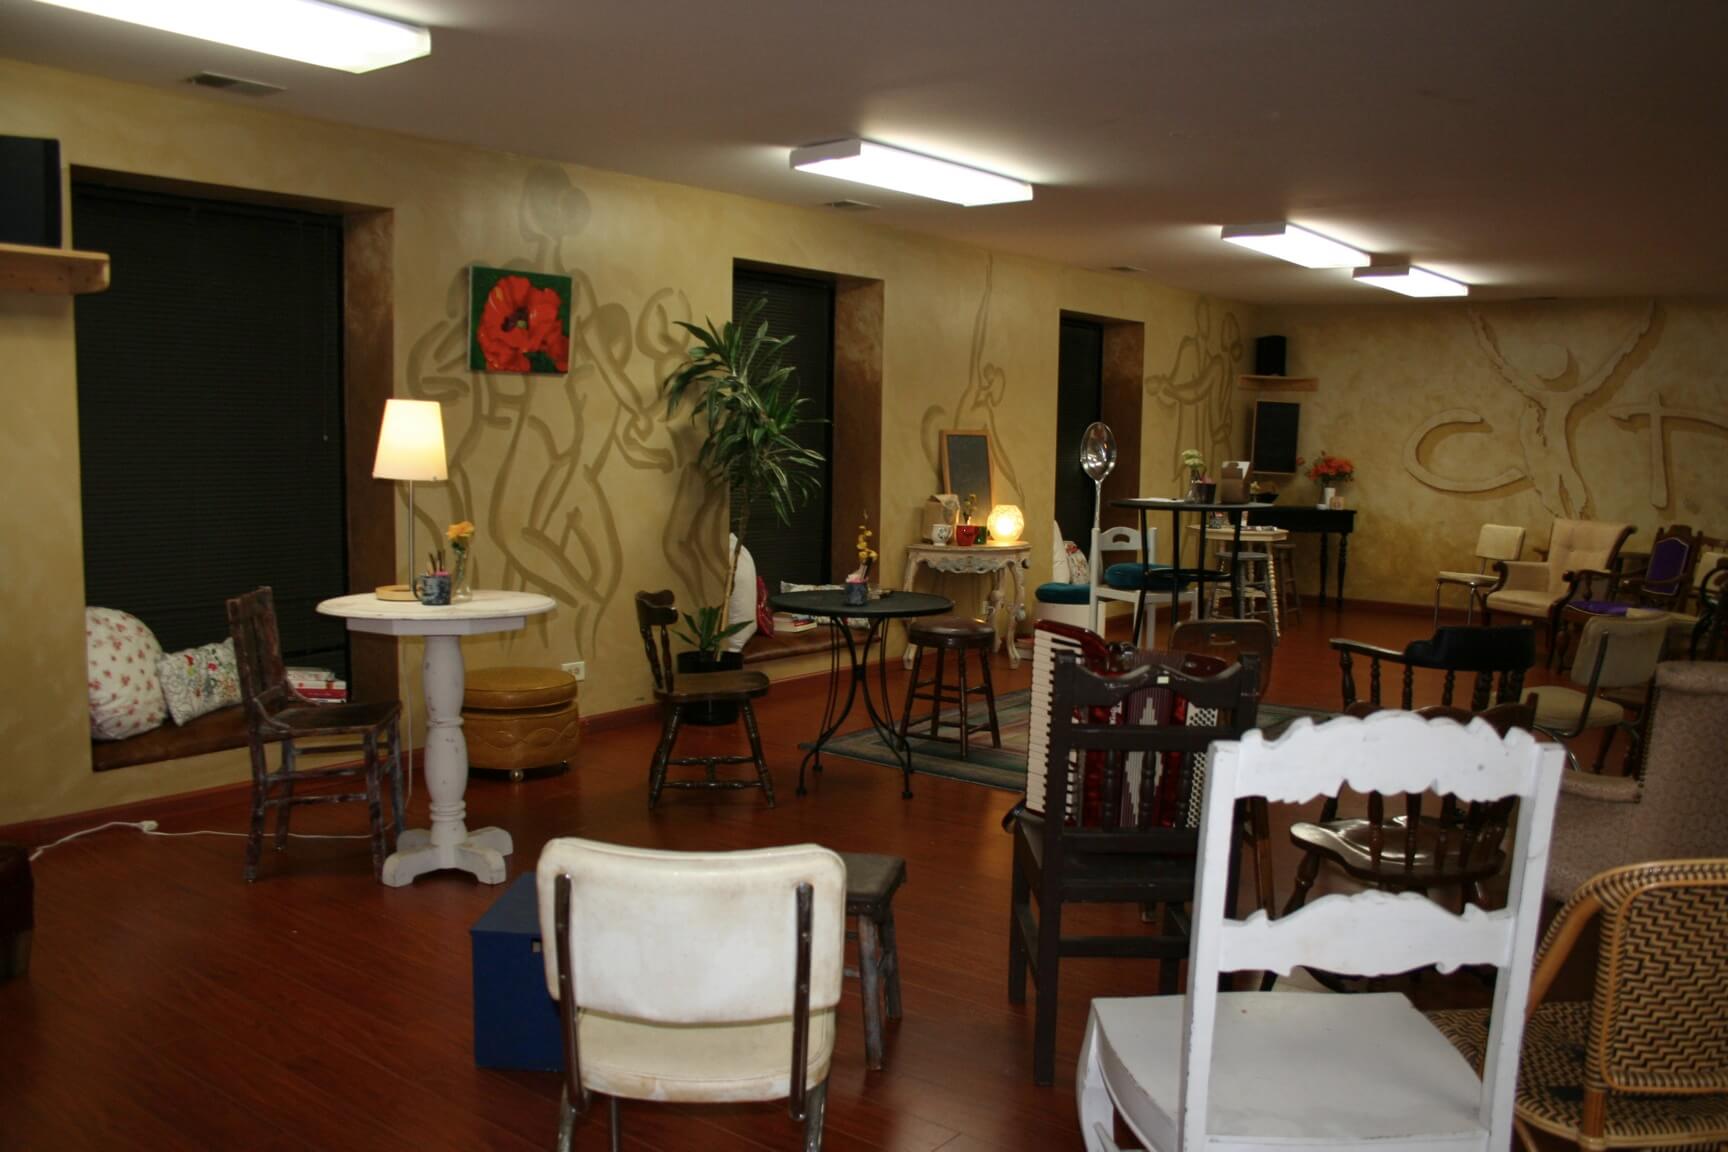
Before: The room used is a Dance Studio

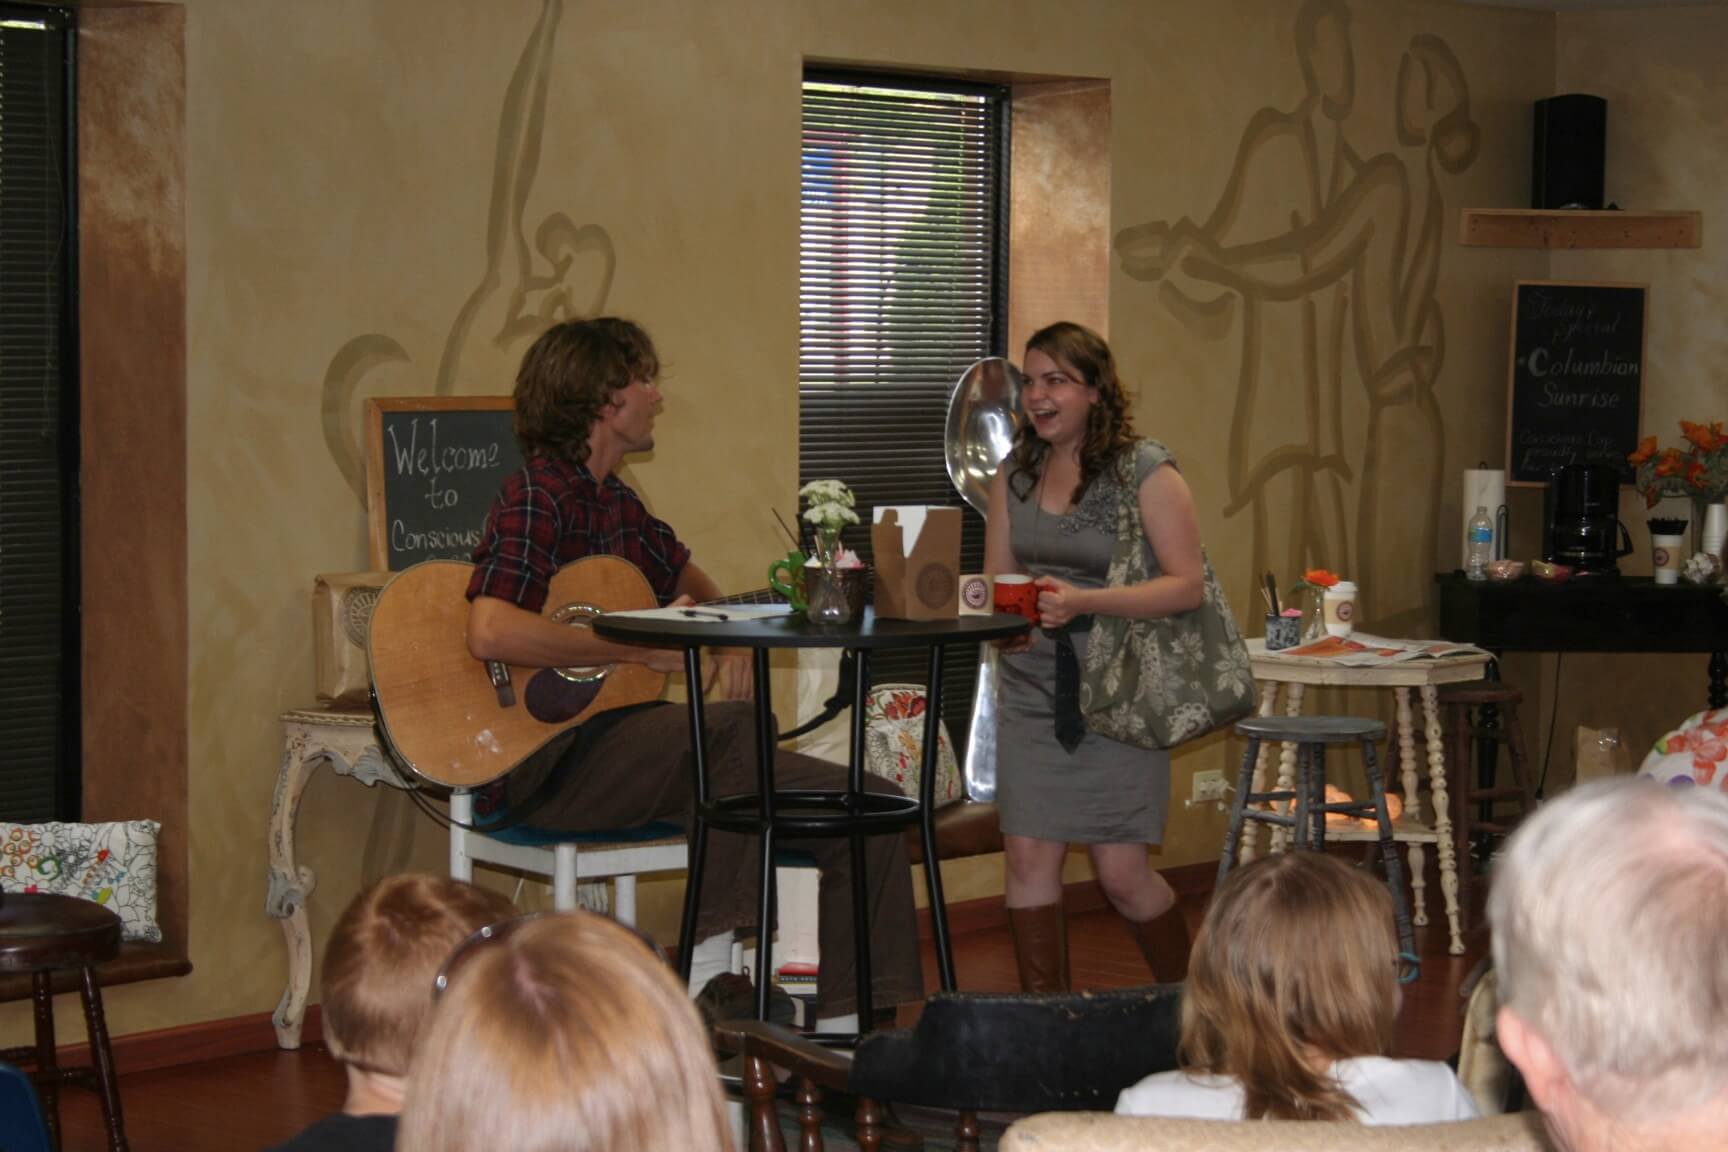
After: Independently owned, artsy coffee shop…think about hippies and the Portland scene

After: Coffee Shop Scene, Audience seated in a chairs of all shapes and sizes to add to eclectic feel of the scene


After: Coffee Shop Scene

Before: The room used is an Office Lobby

After: Living Room in the home of a young couple

After: Living Room Scene entitled “In the Ductwork”

After: The big challenge in this scene was covering the large posters on the walls and hanging the curtains without hanging anything in the walls. Thanks to Rachel Rack, a lot of fishing line, and a drop ceiling…mission accomplished.

Before: The room used is a Conference Room

After: This scene takes place in a Bedroom. Scene called “I Can’t Remember It Right Now”

Before: The room used is an Office Kitchen

After: Kitchen in an apartment, scene from “The Odd Couple”

After: “Odd Couple” Kitchen Scene…and yep that’s my hubby Matt playing Felix Unger…My personal favorite scene but I guess you could call me biased.

Inhabit: Scenes in a Warehouse

Inhabit: Scenes in a Warehouse

I’ve been really busy lately working on a new project…always got my hands in a new project I suppose. I’m the set designer for Inhabit: Scenes in a Warehouse this year.

What is Inhabit?
Inhabit is an annual show that is a series of short plays performed in nontraditional spaces. This year the plays are going to be performed in the Christian Youth Theater warehouse and office spaces. Musicians will perform and lead the audience through the various spaces from one scene to the next. The plays will be followed by an art show, where local artists will be showing and selling their work.

Inhabit was started by actor/director, Kellee Stall as a way to “provide a safe place for artists to tell a story with excellence and to validate the artists through compensation.” And mission accomplished that’s just what has happened with Inhabit. Actors, designers, musicians, and artists all get to create together to make something wonderful to share with others and actually get compensated to do it. As any artist knows, we use our skill often for free so to be compensated is an amazing aspect of the project.

How am I Involved?
My job as the set designer is to transform an office lobby into a living room, a dance studio into a coffee shop, a conference room into a bedroom, an office kitchen into an apartment kitchen, a warehouse into a garage sale, and a truck port into a park. Needless to say I’ve got my work cut out for me. I’ve had some great help along the way from Kellee Stall and Rachel Rack as this is my first time to do set design. These women are guiding me along through all the crazy amounts of details.

Also, I should mention my hubby is one of the actors this year, so its fun to be working on a project together.

How Can You See the Show this Year?
It’s a one day only show. Limited seating available. This Saturday, August 27th. Shows at 1pm, 4pm, and 7pm. Ticket reservations required by calling 847-447-6696 or emailing Inhabit2011@gmail.com. Tickets $5 each. Address: 755 Industrial Blvd, Cary, IL 60013.

Check out Inhabit’s Facebook page here: #/event.php?eid=117849454975104

Inhabit was just featured today in the Northwest Herald’s Sidetracks section’s front page. Check out the article here: http://www.nwherald.com/2011/08/24/musicians-actors-inhabit-cary-warehouse-for-unique-event/amt2mmv/

I’ll be sure to share photos of the set soon after the show!

Start Gardening: Part 5

Start Gardening: Part 5

I was thrilled as I approached my garden and saw such large leaves and tall plants, thinking about how much it has grown. And then upon getting closer I jumped with joy at the site of produce ripe and ready to be picked…There it all sat ready for me…zucchinis, kale, tomatoes, cabbage, green beans, and cucumbers!

I think this is the most fun time of year to have a garden because its beginning to be harvest time! This year we’ve put quite a bit of work into our garden, so its really nice to be reaping the fruits of our labors.

We left our garden with bags of produce; plenty to eat and some to share. I think our most exciting harvest were the zucchinis. As I approached them, all I could think, “is that this was not what I thought I planted.”

I thought I had planted the regular small, dark green zucchinis that you see in the grocery store. When in fact what I had planted are quite large and have white stripes on them. Sure enough after some research Matt and I discovered that what we had were Cousa Squash. These are middle eastern summer squash that is larger and thicker than regular zucchinis with whitish, green striping. They have a bit of a nuttier flavor than regular zucchinis as well.

We wondered what to do with these squash? I’ve never even heard of them. How do I prepare them?

I’m very excited to say, I’ve found quite a few ways to prepare them and can’t wait to share with you. So, look forward to my upcoming posts on various ways to use your zucchinis or cousa squash.

Fresh Blooms: Bring ‘em Indoors

Fresh Blooms: Bring ‘em Indoors

Major power outage today in the Chicago’s Northwest suburbs, so I’m seeking refuge in a local coffee shop…never been so grateful for wi-fi, AC, a toilet I can flush and fresh water (we’re on a well, so no power means no flushing and no water as well), and fresh coffee (didn’t get it this morning before the power went out..and I’m no fun to be around if I don’t have coffee).

Apparently the power could be out for a few days, but I’m praying it’ll be back on much sooner. So, with the power out I thought it’d be a good day to show you how to bring the fresh beauty of the outdoors inside without much effort.

These are some Spring blossoms I brought indoors as they were blooming in my yard. First there was Lily of the Valley. These little bells of fragrance grow very low to the ground and often just look like ground cover growing around trees and in shaded flower beds. Often the leaves of this plant grow pretty thick and cover the blooms from sight, so clipping a few and bringing them indoors really displays their delicate beauty.

For Lily of the Valley I suggest placing a handful of blossoms in a colorful bud vase. Just this small cluster of blooms filled the whole living area of my home with a delightful fragrance…added bonuses of these buds! Keep their vase full of cold water and they’ll stay fresh for about a week.

Blooming next in my yard were the Lilacs. My whole neighborhood seemed to be filled with thick Lilac bushes this Spring. Lilacs grow in a variety of colors from purple to pink to white on rather large twiggy bushes. They are extremely fragrant, so a small cluster in a vase can really fill your home with a fresh scent. I’m not a fan of artificial lilac scents, but the real thing is delicious. Caution: some people are sensitive to their scent, but if you’re not, they’re perfect indoors. I suggest clipping a few twigs full of blossoms and placing them in a medium sized, clear vase. These cut flowers remained fresh in my home for about 4 to 5 days.

Popping up next in my yard were one of my favorites: Peonies. These delicate flowers grow in medium sized bush fulls in beds that receive partial sun partial shade. Peonies bring a truly romantic air to bouquets and vases everywhere from your home to a bridal bouquet…you can’t go wrong with these blooms, growing in varieties from dark pink to white.

I really think peonies are lovely in the natural bushes outdoors, but their beauty really seems to be displayed the best when they’re clipped and placed in a cluster in a medium to large sized clear vase in your home. They not only bring a fresh fragrance indoors, but add a touch of romance to your interior decor.

When you’re cutting a bunch of peonies, I suggest clipping half blossoms that are already mostly opened and half blooms that are in their bud form. This really seems to make your bouquet last the longest; mine lasted just over a week. Ok if you have peonies in your yard, I know exactly what you’re thinking…”They are always covered in ants outdoors. There’s no way I’m bringing them into my home.” Well, here’s your tip of the day…

Clip the bunch of peonies, tie some string around the bouquet and hang upside down for about an hour on your porch or deck. With gravity working to your advantage, the ants will work their way out of all the nooks and crannies of the flowers and you can bring your bouquet indoors bug free! Timing wise, clip the blooms before a heavy rain hits, as the rain destroys the blooms on their bushes.

General flower clipping tips to keep your flowers lasting their best the longest indoors:
-Use sharp shears to clip flower stems
-Clip stems at an angle
-Clip the stems a little longer than you want them to be in their vase
-Clip stems outdoors, bring flowers indoors, fill vase with cold water, clip stems again and immediately place in vase
-Keep water in vase free of flower petals and leaves
-Change water in your vase at least every other day
-If its cooler in your home, the clipped flowers will last longer
-Don’t place clipped flowers inside sunny windows
-Clip some flowers that have already bloomed and some just before they bloom to make the bouquets blooms last the longest
-Remove dead or wilted flowers from your vase ASAP

I hope you’ve enjoyed these tips to help freshen your home, bringing the outdoors in. If you live in the Midwest, here are some blooms to start looking for in your yard right now and in the months to come: zinnias, black eyed susans, daisies, cone flowers, hydrangeas, roses, and sunflowers to name a few. Enjoy the season both outdoors and inside your home!

Start Gardening: Part 4

Start Gardening: Part 4

Its been a while since you’ve seen my garden plot and wow has it grown! We’ve harvested tons of lettuce (loose leaf, bibb, and spinach) and have made tons of garden fresh salads.

The great part about lettuce is that it continues to produce more delicious leaves after you pick them. We haven’t replanted the lettuce at all and yet we’re still getting more and more! I have to admit that I’m not much of a salad girl, but when it comes to garden fresh, I love it. Check out these tasty salads.

I’ve also started to pick kale and cabbage leaves and chop them in with my other varieties of lettuce for my salads. They’re both kind of bitter, but mixed in with the other varieties they add a great melody of flavors and tons of extra vitamins and minerals.

To turn this garden salad into a heartier dinner salad I added black beans, sunflower seeds, and sliced yellow and red peppers. With a simple olive oil and balsamic vinegar dressing (1:1 ratio of each) it brings the flavors all together.

This is our second planting of radishes and they are a great addition to salads and a really spicy snack with hummus.

We’ve also recently harvested some small carrots. I must admit I was really a skeptic when it came to the carrots. I really didn’t think they would grow but much to my surprise, they proved me wrong.

My proud gardening hubby, very pleased with his harvest.

We’ve also picked a small bunch of really sweet peas and a few squash blossoms (post to come on how to eat these).

We haven’t really done anything special to get our garden growing along…just plenty of sunny days (provided by the Lord), water, and lots of love. Squash and tomatoes to come soon!

Start Gardening Part 3

Start Gardening Part 3

With warm sunshine and lots of rain, my garden is growing very nicely. The seeds have sprung into sprouts that have pushed their little heads through the soil and are now reaching for the warm Spring sun. The lettuce, cabbage, broccoli, spinach, peas, radishes and kale are loving the cooler days. And as the sun starts to warm the rich soil in the next week, it’ll soon be time to plant the tomatoes, squash, and cucumbers outside.

So, how do you prepare your seedlings you planted in containers indoors for planting in your garden outside?

Once the seedlings begin to lose their first leaves, grow their true leaves and are gaining height quickly you know they are almost ready to be planted outdoors.

Next, its time to move the seedlings in their containers outdoors. They should be placed somewhere outdoors where they’ll get some sunlight but not a full days’ worth of hot sun. Make sure to keep them well watered and watch how low the temperatures fall at night. If the temps are dropping low bring them indoors. They should stay in their containers outdoors for about a week in order to be properly acclimated.

Once your seedlings begin to sprout in your garden, what’s the next step?

If you’re like me, when you read a seed packet and it says to plant the seeds however many inches apart, you think, “but if I plant more that’s even better.” Sorry to say like I found out, wrong…The seedlings won’t continue to grow to maturity unless they have enough room, sunlight, and water. And if they’re planted too close together they rob each other of all three.

So, once your seedlings begin to sprout through the soil, you have to cut some of the seedlings back so the remaining ones will continue to grow larger. Cut them down at the soil level, leaving enough seedlings properly spaced according to the specific seedling packet.

Once you’ve cut down all those little seedlings that weren’t spaced far enough apart, don’t throw them out.
Did you know you can eat the spinach, lettuce, and radish seedlings? I added the seedlings to a some store bought lettuce and had my first taste of my garden produce…even as small as it was.

Make sure to watch your garden plot to see if any little critters have been enjoying your garden space. I found that a few neighborhood deer just loved tromping through my little garden plot, so some fencing was in order.

Enjoy your yard this growing season by joining me and growing your own food!

Spring Beauty

Spring Beauty

Spring is slowly making its way north. So, I thought I’d share some photos of Spring from Indianapolis, St. Louis, and Chicago. I experienced Spring in St. Louis about a month ago and Spring in Indy last weekend. Come on Spring in Chicago!

From crocuses to blue bells to crab apples to hyacinth to magnolias these beautiful blossoms are sure signs of Spring.
Get outside and enjoy the beauty!

Start Gardening Part 2

Start Gardening Part 2

Even though this week is feeling more than winter than spring temperature wise, flowers are still budding and my gardening efforts continue. So, did my seeds I planted in small containers indoors a week and a half ago ever sprout and push through the soil? Should you even try to plant seeds to start them indoors? Does it actually work?

I’m excited to say YES! Its only been a week and a half and my zinnias (flowers) are growing quite nicely.

My tomato seeds are springing up from their little egg carton cups, bending to reach for the sun. I was most skeptical about the tomato seeds because I’ve never grown tomatoes from seeds, but so far they’re working really well.

My cucumber and squash seeds are poking their little sprout heads through the soil and growing more each day.
All I’ve done with my potted seeds is to plant them in well drained containers in a mixture of potting mix and seed starting soil. I’ve placed them in well lit windows inside my home and watered them with warm water as needed and Voila!

Matt and I started planting in our garden over the weekend as well. But, first we had to create our garden plot. So, how did we do it and how can you start a garden of your own? Keep on reading.

Plotted out our the garden area by spray painting where the perimeter would be. Then we dug out the sod and set it aside. Make sure to get all the grass roots out of the garden area so you don’t get grass growing up in your garden. Then we shook and scraped all the soil off of the clumps of sod, so we still had enough soil in the garden bed. Then we tilled and raked the soil, adding about 5 bags of top soil into the mix.

Then we took twine and sticks to plot out the planting areas within the plot. We decided to divide our large plot into 2 smaller plots with a walkway down the center so we could get into the middle of the garden to weed without stepping on the plants. We decided to plant our seeds in short rows going from the outer long edges toward the center. We marked each row with a small stick stuck int he ground along the outer perimeter of the garden. I then drew out the garden on a piece of paper, writing down where each item went and will go.

We laid out the seed packet of each thing we are planning to plant so we could plan out where everything was going to go. And then we planted the seeds of the vegetables that could be planted this early in the year. Plants like radishes, broccoli, cabbage, lettuce, and peas can be planted while its still chilly outside. We made sure to plant all the seeds leaving a 5 to 6 inch border around the edges for timbers we will later place around the edges to keep the grass and weeds out. Water the garden really well right after planting.

Because our garden plot sits on a slightly graded area I was a bit concerned that when I watered it or it rained really hard the soil would all wash toward the lowest area. So to help prevent the soil from washing away I lined the center pathway through the garden with stones that actually did help block the soil from running down the grade.

I hope this inspires you to start your own garden this year too!

Nacho Appetizer Tray

Nacho Appetizer Tray

Like I’ve said before, one of the toughest food scenarios I face with my restricted diet is appetizers and finger foods.
What to eat or bring to get-togethers and parties that doesn’t have dairy, eggs, gluten, or any of my other random no no foods. All the frozen appetizers you can buy and heat up in the oven are breaded, fried and have cheese. Most dips have cream or cheese. Dessert? Forget it if its not homemade with specialty flours and egg replacers.

So what’s a quick appetizer you can throw together last minute that will be a hit?

Try a Nacho Appetizer Tray! I got this idea when I was walking through the grocery store looking for something to make last minute for a get-together. I saw this pre-made layered nacho dip (layered refried beans, sour cream, cheese, salsa, tomatoes, olives and green onions). A small tray of this dip ran about $16. Expensive for what it was if you ask me.

I couldn’t eat this dip tray because it had cheese and sour cream mixed in with it.
So, I thought why not serve a disassembled version of this?

I decided to serve the chips and salsa in a typical chip and dip tray and then served the remaining toppings in small glass bowls on glass trays. I put a spoon in each and set out small plates so everyone could pick and choose their own nacho toppings. It turned out to be very inexpensive, easy to do, and had a lot less preservatives than the pre-made tray. The only real prep work included taking the salsa, beans, cheese and chips out of their containers and into the serving trays. I cut up the green onions, olives and tomatoes and put them in their serving trays. Voila!

Here’s a list of what I included in my Nacho Appetizer Tray, but you can pick and choose what you want to include in yours.

Corn chips
Salsa
Diced tomatoes
Sliced green onions
Refried beans
Sliced black olives
Shredded cheese

Other toppings you could include:
Sour cream
Fresh cilantro
Melted nacho cheese
Pico de gallo
Black beans
Seasoned ground beef or turkey

I hope this gives you another option of something to served for your next party!
With the left overs I made a meal of taco salads, which turned out really tasty. Enjoy your next party even on a restricted diet!

Spring Has Sprung: Gardening Jumpstart #1

Spring Has Sprung: Gardening Jumpstart #1

I think it’s now safe to say that Spring has FINALLY Sprung in the Chicagoland region where I live! After a rough winter with one of the worst blizzards in history, I have to say I couldn’t be more grateful for Spring than I am this year. Sure the official date of Spring was a while ago, but the temperatures are just now starting to show signs that my beloved season, Summer, will in deed be on its way this year. The trees are just beginning to bud and the crocuses, daffodils, and tulips are now peaking their greens and blooms through the mulch and grass. I now consider it Spring!

As you have been able to tell from the wide variety of topics I share on this blog, I have a lot of interests, passions, and hobbies. One I’d like to share today is my love for gardening! Why Gardening you ask? Gardening is such a relaxing activity that Matt and I both love. It’s a low cost activity for us and allows us something to enjoy outside all summer long. We hope to use it as a source of organic produce as well.

Looking for a way to keep your kids busy outside when the weather is nice? Introduce them to gardening. It’s a great way for them to burn energy outside, while also educating them about biology, God’s creation, healthy eating, and introduces them to a new hobby! Have a picky eater? Try getting them involved in growing some of their own food. There’s significant research that shows that kids are more likely to eat fruits and vegetables if they take part in cultivating them.

I may be slightly high maintenance (my hubby will laugh at the word slightly), but I have to say there is nothing better than hands, feet and knees covered in dirt from working outside. I can’t say I’ve acquired a completely green thumb, but it’s getting greener as I learn more. So, I invite you to join me in getting a little dirty this Spring and start a garden of your own.
How do you start a garden of your own? Here’s how I started mine.

For the past few years we resided in an apartment with just a balcony of outdoor space, but because we both love gardening we made it work and covered our balcony with planters as if it were a yard. We grew everything from various flowers to herbs to tomatoes to cucumbers and radishes. (I had to draw the line though when Matt wanted to plant corn).

Now we live in a house with a yard, so we have the room to plant much more. But, I encourage you if you just have a small balcony fill it with planters and enjoy!

Start your gardening season by first cleaning up your yard or whatever planting space you have. If you only have a balcony, congrats, less to clean up. If you have a yard, rake up the leaves and sticks that have been blowing around your yard all winter. Especially pay attention to your flower and garden beds by cleaning up dead plants from the previous year.

I decided to start some of my plantings indoors this year as its still a little chilly to plant certain crops. I’ve seen the cute little planting trays in the stores, but my frugality and hate for waste kicked in and I collected my own. Egg cartons, cottage cheese containers, trays that you get mushrooms and mixed greens in work perfectly. I poked holes with a knife in the bottom of all the containers except the egg crates because the cups are so small. I’ve been collecting these for a few weeks now. I encourage you to dig through your recycle bin and get creative.

I don’t normally grow everything from seeds and I suggest if you’re just starting to garden to start some things like tomatoes from plants you buy at your garden store. I thought I’d be a little more adventurous this year and try to plant more from seeds. We’ll see how it goes!

I used a combination of soils to start my container plantings indoors. When planting from seeds use some seed starting formula soil. It’s available at garden stores and larger stores like Walmart that have a garden department. I mixed some of the seed starting formula with some potting soil. Follow the seed packet directions for the depth the seeds should be planted. Cover and water thoroughly (gradually for the ones in the egg cartons).

Make sure to keep the names of the plants with each container so you don’t forget what’s in each one.

Bring them inside and place in windows that get sunlight. Seeds are supposed to begin to sprout in 7 to 14 days. I’m only on day 2 myself so I’ll let you know how they work.

Make sure to put something underneath the containers that you poked holes in. The lids of some of the containers work really well for this purpose.

I hope this gets you excited to start your own planting this year. Gardening doesn’t have to be anything major. You can start this year by just growing some tomatoes in pots and then add some more each year. Stay tuned and watch how my garden grows this year. Let me know how it goes!